

With cyber threats evolving constantly, IT teams face immense pressure to safeguard data from malware, phishing, and insider threats. Microsoft’s Purview platform, equipped with a powerful DLP module, provides a proactive defence. Data Loss Prevention (DLP) is a security solution that helps prevent unsafe sharing and inappropriate transfer of sensitive data. DLP is utilized to protect and monitor sensitive data across both on-premises systems and cloud-based locations within our organizations.
This blog post tackles the critical issue of data security in Microsoft 365. With the ever-growing threat of cyberattacks, protecting sensitive information like social security numbers, credit card data, and “Confidential” documents is paramount.
Microsoft Purview’s DLP module offers a powerful solution to address this challenge. We’ll delve into its importance and provide a step-by-step guide to configure a DLP policy that meets your specific needs.
Scenario:
Block all external sharing of SharePoint and OneDrive items containing sensitive information like Social Security Numbers Credit Card Data etc. and Sensitivity labelled item.
Alerting the Email notification to the security team for every blocked file sharing attempt. User notifications within the interface (if available).
By following our guide, you can gain control over sensitive data sharing and confidently navigate today’s complex cybersecurity landscape.
Step-by-Step Guide to Creating a DLP Policy in Microsoft Purview
This guide walks you through creating a Data Loss Prevention (DLP) policy in Microsoft Purview to prevent accidental or unauthorized sharing of sensitive data in SharePoint and OneDrive.
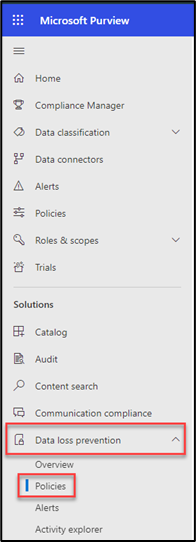
- Access the Compliance Portal:
Go to the Microsoft 365 Admin Center and navigate to “Compliance.”In the left-hand pane, find “Data loss prevention” and then “Policies.”
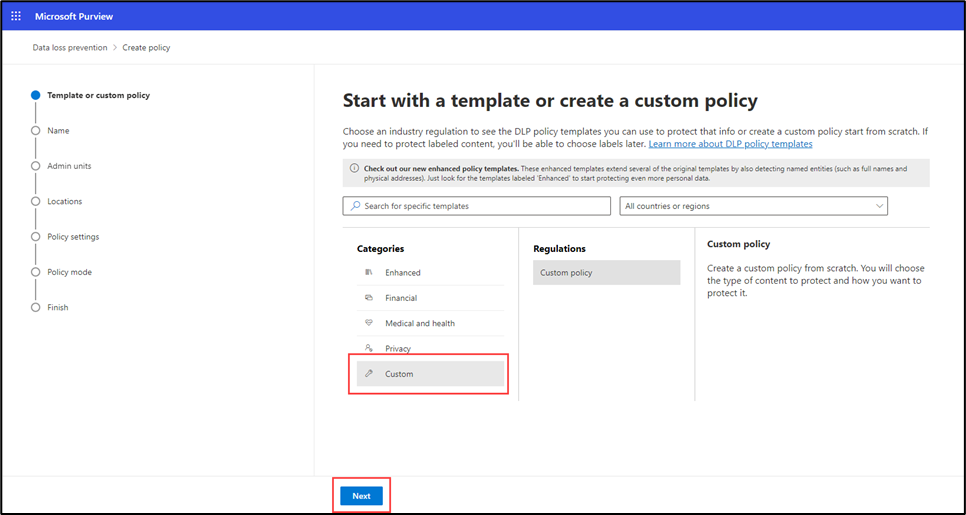
2. Create a New Policy:
Click the “Create policy” button.

3. Define Policy Details:
Under “Categories,” choose “Custom.” Under “Regulations,” select “Custom policy.”
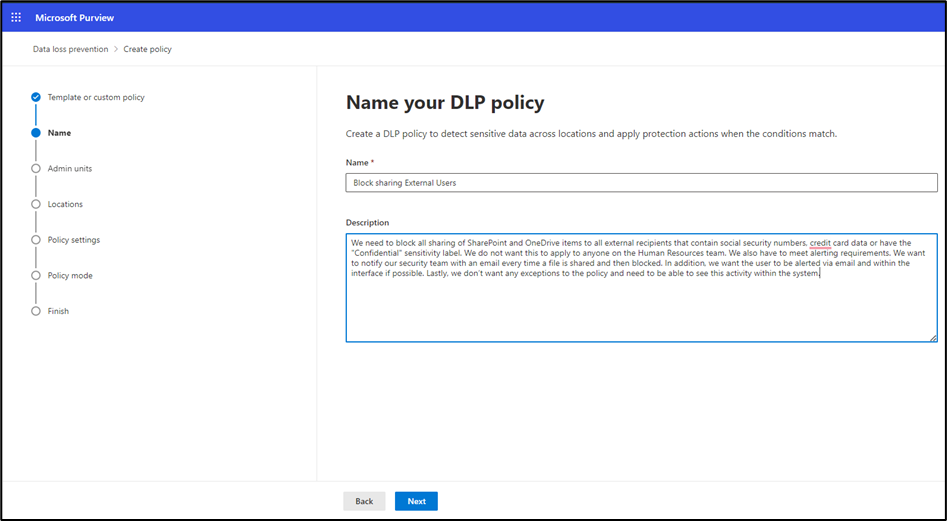
Click “Next” to proceed. Give a proper policy name and description.
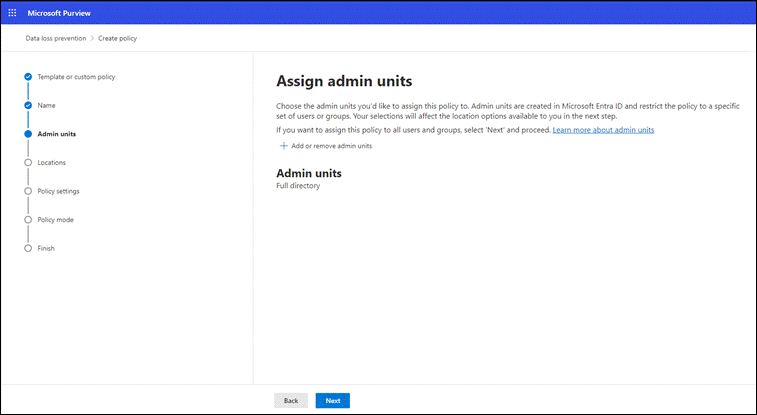
- Assign admin units for users or groups:
Similar to the default template approach, assign admin units from Microsoft Entra ID to limit the policy to specific users or groups.
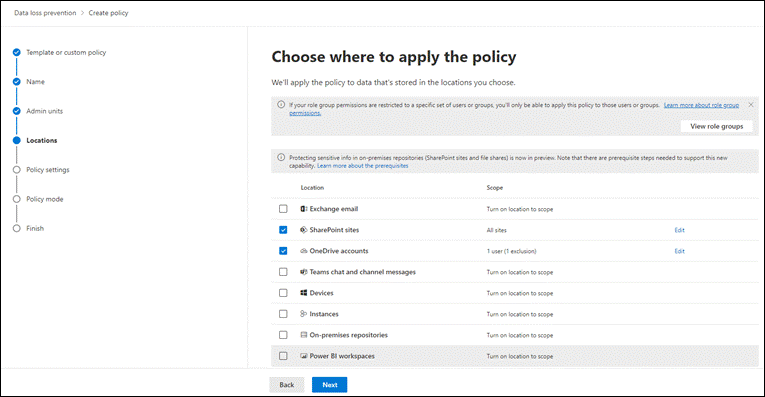
- Enable DLP for SharePoint and OneDrive:
Turn on DLP for “SharePoint sites” and “OneDrive accounts.” Leave other locations disabled. Click “Next.”
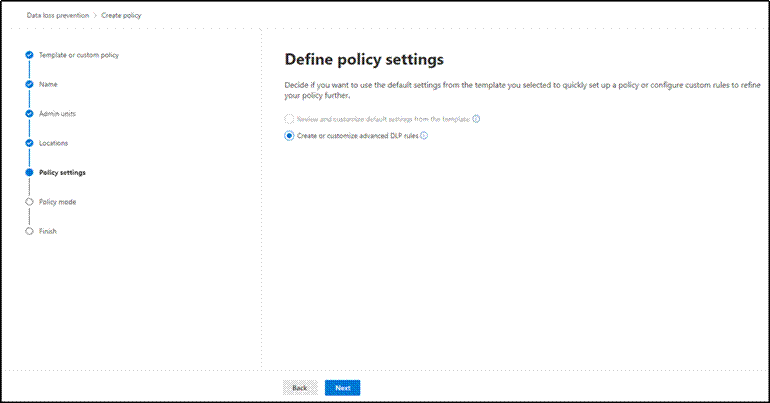
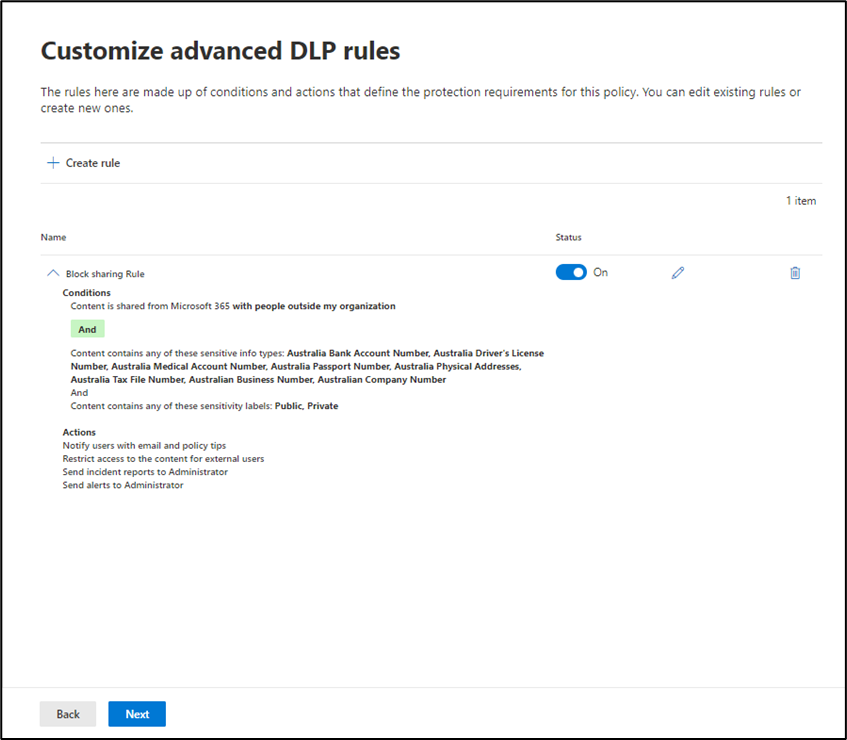
- Create and Define DLP Rule:
In “Define policy settings,” ensure “Create or customize advanced DLP rules” is selected. Click “Next” and then “Create rule.”
Give your rule a clear name (e.g., “Block External Sharing of Sensitive Data”). Briefly describe the rule’s purpose.

- Set Rule Trigger Conditions:
Click “+ Add condition”. Choose “Content is shared from Microsoft 365.” Select “with people outside my organization.” Choose “Content contains” and choose appropriate data types based on your needs. In this case, we’ve selected for sensitive Australian information such as credit card numbers, passport numbers, etc.
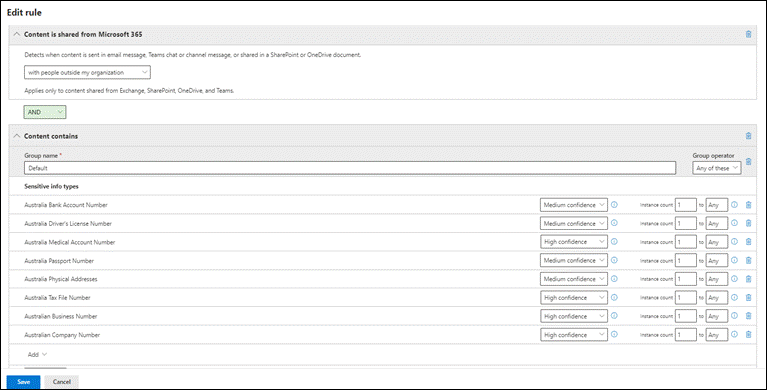
- Identify Sensitive Data:
Click “+ Add condition” and set the logic to identify content matching both conditions (AND). Create a new condition group with OR logic (matches at least one condition. Create a new condition group with AND logic (matches at least one condition). Choose “Sensitivity labels” and select the labels based on your needs.
- Block Unauthorized Sharing:
Under “Actions,” choose “Restrict access or encrypt the content.” Select “Block only people outside your organization” to prevent external sharing.
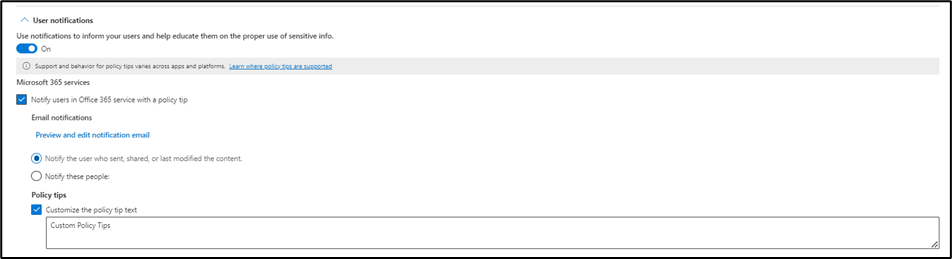
- Notify Users:
Enable “User notifications” to inform users attempting to share sensitive data through a policy tip in Office 365 services. This will notify the user who shared the data.
- Prevent Sharing Overrides:
Ensure “Allow override from M365 services” is not selected to prevent users from bypassing the policy. - Set Up Reporting:
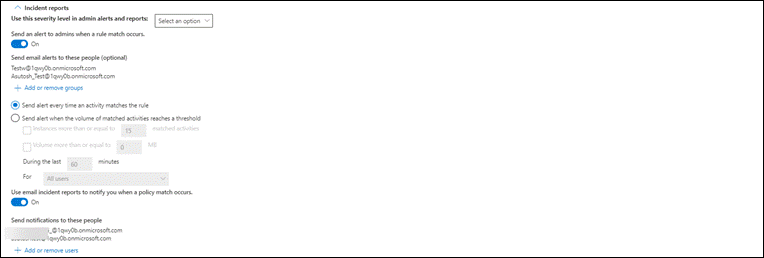
Set “Use this severity level in admin alerts and reports” for informational purposes.
Enable “Send an alert to admins when a rule match occurs” to notify admins of potential incidents. Optionally, add email addresses for receiving alerts (e.g., security team). Choose to send alerts for every rule match. You can also enable and add the user to receive incident reports via email when a policy match occurs.
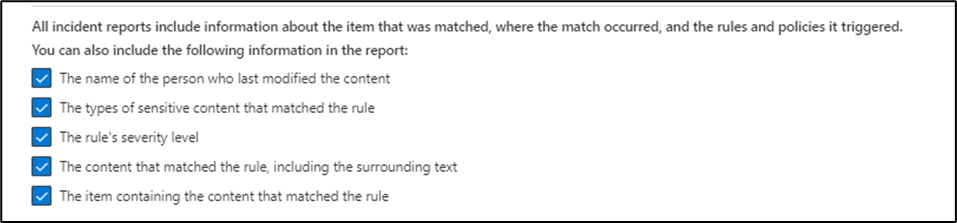
Choose the necessary details for incident reports, including the matched information, the location of the match, and the activated rules and policies.
Review the DLP Rule After Creation:
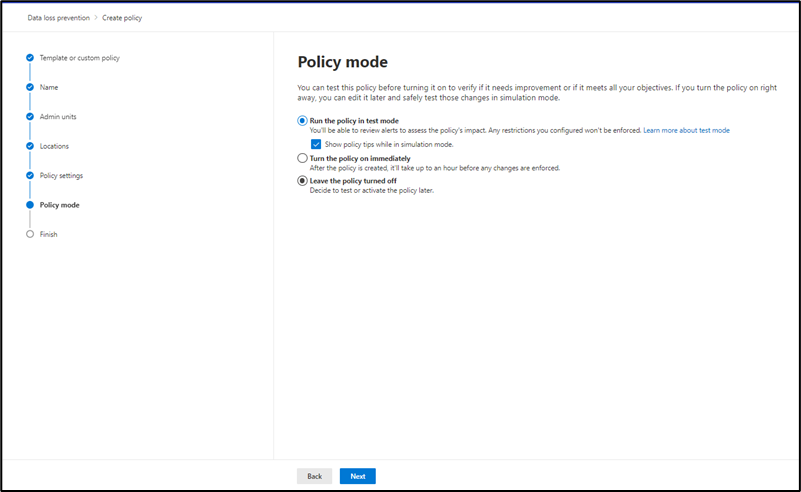
- Set Policy mode:
The “State” setting determines when your DLP policy becomes active. It’s recommended to keep the policy off while you’re configuring it and getting approvals. Click Next and then Submit. Click Done.
Here are the available state options:
Run the policy in test mode: You’ll be able to review alerts to assess the policy’s impact. Any restrictions you configured won’t be enforced. Users also receive informative messages to raise awareness about the policy.
Turn the policy on immediately: This enables full enforcement of the policy. After the policy is created, it’ll take up to an hour before any changes are enforced.
Leave the policy turned off: Decide to test or activate the policy later.
Remember: You can change the policy state at any time to adjust your rollout strategy.
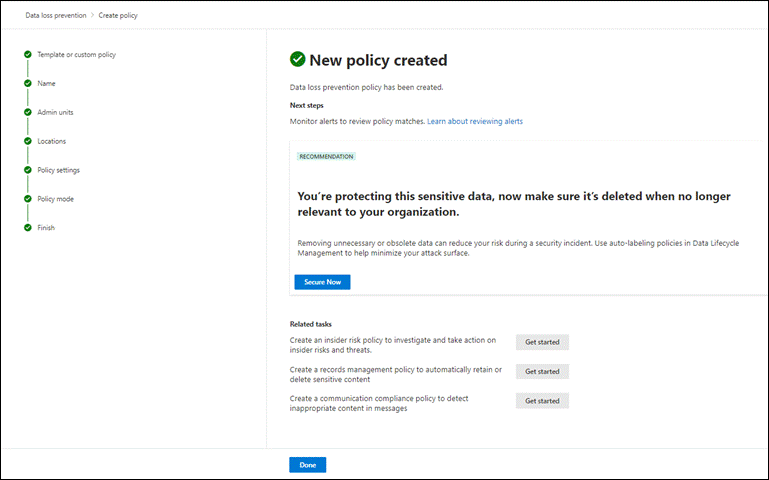
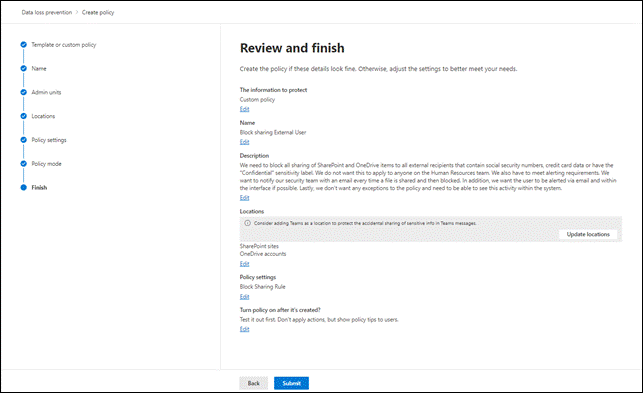
- Publish the Policy:
Click “Submit” to finalize and publish the DLP policy.
Conclusion
By following the outlined steps, organizations can create and implement Data Loss Prevention (DLP) policies in Microsoft SharePoint and OneDrive. These proactive measures significantly enhance data security by preventing accidental or unauthorized sharing of sensitive information. Remember, minimizing the risk of data breaches and ensuring compliance with data privacy regulations require continuous efforts. Regularly monitor policy effectiveness, gather user feedback, and optimize your DLP strategy for a robust security posture in today’s dynamic digital landscape.